Corn Casserole by Carmen

I love the combo of sweet and spicy. Don’t know whether it’s a Cuban thing or not, although Cubans have a tendency to have a lot of sweet/spicy or sweet/salty kinds of combos. The easiest one to do and a staple in my house — pasta de guayaba (which is guava paste) with queso blanco (white cheese which is kind of like a salty more set Farmer’s Cheese). Aged cheddar is always a good substitute.

One of my favoritest combos of sweet/spicy is a pairing of my sister Carmen’s Corn Casserole with chili/taco meat. YUM!!! Actually, the corn casserole is fabulous in and of itself and I could eat a huge bowl of it all by myself. The casserole is a cross between cornbread and Virginia spoonbread and again, YUM!!!

Carmen’s Corn Casserole is much easier to make than the spoonbread. So easy you’ll say, I can make this all the time. My sis serves it topped with monterey jack cheese and we often pair it with chili or taco meat for a tasty lunch/dinner. If you like this basic recipe, you can experiment by chopping and adding red peppers, jalapenos, cheddar cheese or even some finely diced onions to the mix for a change of pace.

So here is today’s Tuesday Tip and Cook’s Treat addition –
Carmen’s Corn CasseroleSis and Me in our version of a Myspace photo!

One 15 ounce can cream corn
One 15 ounce can kernel corn drained
One pint low fat sour cream
One stick melted butter
One package Jiffy corn muffin mix
One cup shredded monterey jack cheese (optional)

Preheat oven to 350 degrees.

Combine first 5 ingredients. Grease casserole or brownie pan with butter. Pour ingredients into pan. Bake for 45-50 minutes until firm. Sprinkle cheese over top and let melt 5 minutes. Remove from oven and let casserole sit for another 10 minutes. Enjoy!

Hoep you liked this Cook’s Treat and Tuesday Tip!

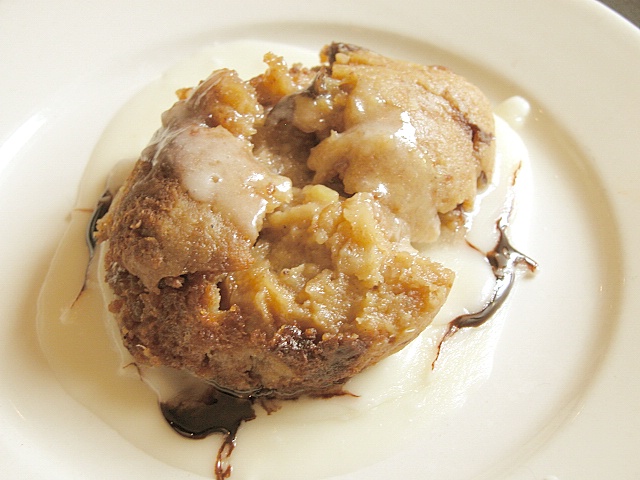
Grandma’s Bread Pudding

Image released into the public domain by Jason Perlow at WikipediaMy abuelita Nieves was a fabulous cook! She could take any combination of ingredients and make them taste great. Even something as simple as fried eggs and rice (one of my favorite quick meals).

One of her best dishes was an amazing bread pudding. I always loved it and try to make it whenever I can. The basic dish is simple to make and once you get the hang of it, you can try a number of variations, such as substituting brioche for the regular bread or cinnamon-raisin bread for a super cinnamony/raisiny version.

So here’s my Grandma Nieves’s recipe for Bread Pudding! I hope you enjoy it!

Basic Ingredients:

For the baking process: Large loaf baking pan or round quart and a half dish. Corningware is great since you can make the caramel in it and then add the pudding ingredients thereby using only one pan! You’ll also need a large baking dish to use for the bain marie and enough hot water to fill large baking pan halfway up the sides.

For the caramel: 1 cup plain white sugar

For the bread pudding:

3 whole eggs
3 cups whole milk
1 can Condensed Milk (Not evaporated, but Sweetened Condensed Milk. Magnolia or Eagle Brand are favorites!)
2 teaspoons vanilla extract
1/4 to 1/2 teaspoon cinnamon
Raisins (about a 1/4 cup soaked in water or an alcohol like rum for a kick)
A loaf of stale Italian bread (no seeds)

Step 1: Preheat oven to 350 degrees. Place a large baking pan in the oven with hot, but not boiling water about half way up the side of the pan. This will make what is called a Bain Marie. The Bain Marie will help keep the bread pudding from drying out and will allow it to cook evenly.

Me and my grandma!Step 2:Make a caramel much like you did for the Cuban Flan.
Start with 1/2 cup of sugar and dissolve it in 1/2 cup to 1 cup water. Make sure the sugar is fully dissolved before you begin to heat it (if you have any sugar left, it will form crystals and be gritty). Once the sugar is dissolved, set the pan with the sugar over medium heat in a heavy medium/small saucepan or preferably, an ovenproof dish. Use a wooden spoon to stir until the sugar water is reduced (it should get thicker as it cooks). Grandma liked it light, but you can let it get golden and keep on going until it is a dark brown. (Again, be very careful!! Cooked sugar is very hot and can burn the skin if it spatters.)

Step 3: Beat eggs lightly in large bowl. Mix in condensed milk, regular milk, vanilla and cinnamon. Break Italian bread into chunks and place in bowl to soak. Let soak for at least half and hour and then mix with hands to make sure there are no dry spots in the bread pieces. It’s okay if the bread pieces get really really small or even disappear. This bread pudding version doesn’t have large chunks of bread. Once it’s mixed, add the raisins and give one final mix.

Step 4: Place bread pudding mixture into the caramelized pan. Place the pan in the hot boiling water (bain marie) and bake at 350 degrees for about 35 to 45 minutes or until the pudding is set and a knife placed in the center comes out clean.

Cool the bread pudding on the counter for about half an hour before placing into the fridge to chill.

I always loved eating the bread pudding with a drizzle of condensed milk over the top (have you guessed that Cubans love condensed milk yet?)

Hope you try this out!

Beer Steamed Mussels

mussel.jpgMy daughter has been watching THE DEADLIEST CATCH and since we’d never really tried King Crab Legs, I decided to pick up some at Costco. Since they had some great-looking mussels which we all love, I picked up a bag of those as well.

What’s the best way of cooking mussels, clams, crabs, lobster, etc.? Well, I’m a big fan of steaming since it keeps them moist, is quick and relatively easy. My favorite way to steam them is with beer and here’s the recipe for you to try out!

First of all, you’ll need a pot big enough to hold the steaming liquid and your shellfish. I end up needing one that’s at least 12 quarts or more. Before you steam, make sure everything is clean with a quick scrub with a plastic brush. If you’re doing clams, put them in salted ice water for about 15-20 minutes so they spit out any sand. Same with the mussels. A lot of mussels are farm-raised now, so they are relatively clean and beardless so there’s little to clean.

If there’s any clams/mussels that don’t close up after being in the iced salt water, toss them. They’re dead. Likewise, if they don’t open up after steaming, toss them. They’re dead!

Steaming Liquid:

1 or 2 beers
Handful of chopped fresh parsley
3 to 4 garlic cloves chopped
1 small onion chopped
Some pepper
1 or 2 bay leaves

If you want to add a little zing to the liquid, slice up a small lemon and put that in there as well.

Put the liquid in the bottom of your pan and place a steamer insert above it (one of those little collapsible ones you find in the dollar stores). Layer your shellfish with the bigger pieces at the bottom, like the crab legs, whole crabs or lobsters. Then put the mussels, clams, etc. If you want to do some corn and potatoes, put them right above the bigger pieces and below the mussels, etc.

Yep, we’re talking mini-clambake here. Well, almost. Cover the pot, crank up the heat on high and once it’s steaming, it shouldn’t take more than about 8 to 10 minutes to cook all your shellfish. If you’ve got big lobsters down on the bottom, you may need to do 15 minutes or more depending on the size of the lobster.

Anyhow, make sure you’re melting some butter while the shellfish is steaming!

Once you take the pot off the stove, place the shellfish in a big bowl and ladle just a bit of the steaming liquid over them. Also, put a little bit of steaming liquid in a small bowl or cup and also put some butter in a second small bowl or cup. This way you can dip your shellfish in the steaming liquid and then the butter.

Yum! Way tasty! Hope you check this out and enjoy a shellfish summer steam!

Lower Fat Chicken Parmigiana

Photo Courtesy of Microsoft Online Clip ArtThere are some tried and true Italian dishes that satisfy no matter what and you can find at every typical Italian restaurant (like Luigi’s from THE CALLING vampire novels).

Chicken parmigiana is one of those dishes, but when you’re trying to eat healthy, this kind of dish can be a problem. It’s breaded and fried. There’s the cheese with its animal fats and you generally serve it over/next to pasta, a problem if you’re watching carbs.

So what can you do to enjoy this dish? Well, here’s some alternatives that will help you make a tasty chicken parmigiana that even your most difficult critic (like my Italian hubby) will enjoy! Try one or all of the alternatives.

Lower Fat Chicken Parmigiana

Step One: “Breading” the cutlets. This accounts for the step where you can lose the most calories!

  • First Alternative: Most Chicken Parmigiana is breaded and fried. If you don’t want to lose the breading, lose some of the fat by using either an egg white wash or just plain water to get the bread crumbs to adhere to the chicken breast. Lose the dredging the chicken in flour as well. Some will say it helps the bread crumbs stick better. I’ve always found that it just makes the bread crumbs fall off faster and adds extra carbs you don’t need. As for the frying part of this, try baking the chicken! Use a cooking oil spray and lightly grease a baking dish. Place the breaded chicken breasts in there and give the tops of the breasts a spritz with the cooking oil spray. Bake at 350 for about 20 minutes or so (or until the bread crumbs begin to brown).
  • Second Alternative: Again use an egg white wash or water, but this time, dredge the chicken breasts with a good freshly-grated parmesan cheese. In a frying pan spritzed with cooking oil spray, toast both sides of the chicken breasts. The cheese will create a coating on the chicken breasts.
  • Third Alternative: Lose the “breading” entirely to cut out the fat and carbs. Just brown the chicken breasts in a frying pan spritzed with cooking oil spray.
  • Step Two: Using either your own sauce or a bottled spaghetti sauce, spread a thin layer of sauce in a baking dish. Place the “breaded” chicken breasts on the sauce.

    Step Three: Place some sauce on the chicken and then a slice or two of a low-fat or fat-free mozzarella cheese on the chicken. For variety, you can also add a slice of prosciutto, grilled eggplant or zucchini or roasted red pepper on top of the chicken before you add the mozzarella. The addition of the lower fat vegetables really helps to make this a complete meal.

    Step Four: A little bit more sauce on top of the cheese/chicken (but not enough to hide all the cheese since you want it to get nice and toasty in the oven) and a fresh grate of some parmesan! Cook the dish at 350 for at least 30 minutes or so, until the sauce is bubbly and the cheese has browned a bit. You may want to even broil it for a few minutes to toast the cheese, but make sure you have a pan that can be used to broil.

    Last but not least, serve with a whole grain pasta or Barilla’s Plus pasta that has lower carbs.

    Hope you like this variation on an Italian Classic!

    Sweet and Sassy Salad

    Courtesy Microsoft Word Clip ArtThis Tuesday Tip is a recipe for a very flexible, sweet and sassy salad!

    Yes, you read that right — Salad. I know I’ve avowed my aversion to the stuff in various posts, but this is one salad recipe that I love and will actually eat without much complaint. For those of you in the New York area, you may have seen something similar in Cosi, one of the chain sandwich shops. Nordstrom’s also makes a similar salad in their store cafe.

    Why is it so tasty? Well, it’s got the sweet thing going, but also, you can mix and match any of a number of ingredients to make it just the way you want it. So, I’ll give you some of the variations and let you decide how to personalize.

    Sweet and Sassy Salad

    2 to 3 cups of greens (you can use romaine, red leaf lettuce, mesclun greens, arugula, spinach. I like it best with the mesclun greens. Definitely avoid the iceberg lettuce route)

    1/4 cup crumbled goat cheese (you can also substitute blue cheese which is my favorite yum)

    1/2 of a Ripe pear cubed (a nice crisp apple will also work)(if you like it sweet, use the whole fruit!)

    1/2 of a tomato, cubed

    Handful of dried cranberries (or raisins or currants)

    Handful of pecans, chopped (or walnuts)

    Handful of chopped scallions (but not onions unless you’re doing a mild Vidalia or Maui onion)

    Put all of the above in a bowl and toss with a low fat balsamic vinegarette or another mild salad dressing. You don’t want to use a strongly flavored salad dressing because that will interfere/clash with the more delicate flavors of the fruits and cheeses. This salad is so flavorful, you may want to try it with just a hint of vinegar sans oil or even a citrus vinegarette.

    A tip for chopping the nuts without having them go flying all around the counter — stick them in a sandwich bag, put them on the chopping board and with the back of your knife, just give them a few whacks. I guess you’re actually crushing them, but the nuts will break into the pieces and then you just empty the bag onto your salad!

    Voila! A sweet and sassy salad that has a combo of things that are sure to keep you satisfied for a while, namely, some proteins, fats and carbs. One big dieting mistake is to just have plain ol’ salad with dressing and while the volume of the salad will fill you up, without any proteins/fats/carbs to sustain your energy levels, you are just asking for a major energy crash that will make you have hunger pangs.

    The 100 Calorie Crave

    dietfork.jpgOne of the things I’ve found during my last two weight loss campaigns is that it was easier to lose weight if I ate more times during the day, but watched what I was eating.

    Why is that? Well, skipping meals may slow your metabolism as will crash diets (anything less than 1500 calories per day). Your body will sense that you aren’t providing it with enough fuel and slow down to retain the stored energy it has (in other words — the fat you want to lose).

    The other problem with skipping meals and eating less is that when you do deplete the energy you’ve taken in, you will crash and experience major hunger. That may lead to poor food choices.

    What’s the answer and this Tuesday’s Tip? Those ubiquitous 100 calorie packs that are now available everywhere. The problem is finding the ones that are actually satisfying since there’s nothing worse than opening one of those bags and finding that there’s not enough there to satisfy a craving.

    Which ones have I tried and found to be fairly good? Here’s a list of some of the better ones I’ve tried:

      Entenmann’s Little Bites Cookies and Cream
      Sunshine® Cheez-it® Right Bites
      Oreo Thin Crisps
      Nabisco Cheese Nips
      Oreo Candy Bites

    Is there anything bad about the 100 calorie packs? Price for starters. You’re going to pay more for the convenience. Also, as you can tell from my list, the snacks on my list aren’t all that nutritious — they are for satisfying your sweet tooth.

    That also means they are probably high in carbs and may only provide a temporary sugar rush.

    The good part about them, besides the taste, is the portion control. You know exactly how many calories you’re taking in without having to count or measure.

    What other 100 calorie (or less) things can you eat that are probably better for you? Well here’s some of the things I also munch down on:

    Cabot’s Reduced Fat Cheddars (which also come in pre-packaged slices)
    Polly-O Skim Mozzarella and String Cheese
    Apple
    Orange
    Low Fat/Fat Free Sugar Free Yogurt
    Strawberries (10 large)
    Blueberries (1 cup)
    Hard-boiled Egg
    Jello Sugar-Free (one serving is only 10 calories!)

    Not sure of the calories? Click here to use an easy Food Analyzer from Kraft. com.

    Hope this Tuesday tip was helpful!

    Copyright 2008 Caridad Pineiro Scordato www.caridad.com

    Low Fat Ambrosia

    pants.jpgThis is a Tuesday Tip for those of us in the Sisterhood of the Shrinking Pants! After the holidays (the food/the lack of time/the cold that wouldn’t go away) I’ve been back to eating better and working out regularly. The scale is moving downward slowly, but the inches are coming off nicely. Those pants that used to be tight are totally loose so I’ve moved down a size into a 10 for encouragement.

    They fit, muffin-top notwithstanding! I’ve been doing the same thing as before — lots of lean meats, vegetables and dark leafy greens. I’ve added the Quaker Weight Control Oatmeal (big yum) to my morning as breakfast and I’ve been trying to eat more fruit which I hadn’t been doing regularly. How have I done that — fresh fruit for sure, but also by concocting a lower fat and lower sugar version of my mom’s ambrosia.

    Picture of my mom, Carmen, as a little kidMy mom (and that’s a picture of her as a little kid) used to make the ambrosia with full fat sour cream, sugar, vanilla and fruit cocktail from a can. She also used to put coconut and cashews in hers, but I prefer my ambrosia without those.

    Actually, this version still uses fruit cocktail, but leaves out a lot of the fat and sugar. The Dole fruit cocktail I’m using is packed in passion fruit nectar, making it lighter, and it’s also got pineapple and red and yellow papaya chunks. It’s a great alternative to regular fruit cocktail, but you can substitute that. Just use the fruit cocktail packed in light syrup.

    Hope you enjoy this Tuesday Tip!

    Caridad’s Ambrosia

    Ingredients:

    • 2 cups fat free sugar free vanilla yogurt
    • 2 cans Dole Tropical Mixed Fruit(I believe it’s a 12 or 16 oz can)
    • 1 cup mini marshmallows

    Directions:

    In a big bowl (I make it right in the storage container where I am going to put it into the fridge), place the yogurt and marshmallows.

    Drain the juice from only one of the cans of fruit cocktail. You want to reserve the juice from the second fruit cocktail can in a cup for now.

    Add fruit to the yogurt and marshmallows and mix. It should be a little loose and that’s okay. Add about 1/2 to 3/4 of a cup of the reserved liquid from the fruit cocktail into this fruit/yogurt mixture. It should be relatively loose, but don’t worry. The marshmallow is going to bind all the wet ingredients together.

    Cover your bowl and let it sit in the fridge for a few hours. Then enjoy!

    This is a great cool recipe for a hot summer night. Plus, your getting your servings of dairy and fruit all in one. Because you’ve used the juice from the fruit cocktail and low fat and low sugar yogurt, you’ve really cut out a lot of the original calories in the dish.